Showing posts with label house. Show all posts

Friday, June 19, 2015

DIY Ottoman under $100

I made this ottoman 2 years ago when moving into my first solo apartment. I was trying to find one online and any large ottoman was pricey. I decided I'd give it a DIY try and see how well I could do. 

I looked on Pinterest trying to figure out the best way to make one and created an attack plan.

Materials I Used
- 2 x 4's
- plywood square
- 4 decorative fence toppers (these will be used as your feet
- decorative wood trim (optional)
- spray adhesive
- foam - I used 4in thick
- muslin
- quilt batting
- staple gun
- fabric
- drill
- screws

Decide how large and what shape you want. Start out by cutting your 2 x 4s into 4 equal lengths (if you want a square) with a 45 degree angle on the end. Nail these together to create your base

Nail a fence topper to each corner to create the feet. 

I used nailed decorative trim on the sides of the 2x4 to give it more of a finished look and painted it all white. 

Take your plywood, this should be cut to be the same size as your 2x4 frame. Cut and arrange the foam on top to completely cover the wood surface. You are creating the cushion part on top.  

I had troubles finding foam the exact size so I pieced it together to cover it. Use your spray adhesive to permanently attach the foam to the wood. 

To eliminate the lines that piecing the foam together created and add a little more height I used a layer of quilting batting. 
I also layered muslin prior to my final fabric to help smooth these lines out even more. I attached it in the same manner as the final fabric that I describe below. 

I ordered this fabric from fabricguru.com. Sometimes it's easier for me to scroll through pictures than wonder around aimlessly at the fabric store. Fabric guru will send you a sample square for a $1 so you can feel and see it before ordering. 

Place your fabric with outside face down. 


Place your ottoman top down, plywood up in the center of your fabric. 

Start on one side and use your staple gun to attach the fabric to the plywood. 

I did the two opposite sides first, then the next two. I wrapped the corners like you would with a present. 


Once all the fabric is stapled you can cut off any excess that you have.

To connect the top to the base use your drill and screws that are long enough to reach through the 2x4 and anchor to the plywood. 

Flip over...

YOU HAVE AN OTTOMAN!

This time around I just recovered it and the design allowed me to reupholster it in about 20 minutes. 

-Madeline

Tuesday, May 19, 2015

Walk-in closet under $165.00

What do you do when you live in a 3 1/2 bedroom house alone?  Make one of the extra bedrooms into a walk in closet!!

Items purchased:
(2) book shelves: I went with this exact one from IKEA because of look and price point 

 pole and socket kit
wooden pole: I went down to my local hardware store, McLendons and a really nice guy helped me find one and then cut it to the correct length for me. 


Next all you have to do is spend the time struggling to put the bookshelves together and screw the socket set to the sides.

The bookshelves set up prior to me running to buy the socket and pole. 


DONE and unpacked!


When you first walk in to the room you see my craigslist dresser redo
 Surprisingly I want to say this only took me maybe two hours. It was a long day of moving...

I'm still working on jewelry storage, mirror, and maybe a bench!


Sunday, May 10, 2015

801 Tour

On Sunday I received the keys to 801 finally! Since then I've been slowly moving loads down as well starting to paint EVERYTHING....

But here is a tour of the house as is!  Lots more to come as we paint and I get all moved in.  Sorry for the horrible photos but I had forgotten my real camera at home.


The Dining room that you enter into
from the front door

The Living room to the left when you walk in


Walking through the dining room you enter in the kitchen.  Which is large enough for a breakfast table.  There is lots of work to be done in the kitchen.  The cupboards need to be painted and there is tons of damage on the wall where there was a leak.


Area for breakfast table

The back door looking from the hallway
So man cupboards to paint...

You then walk through the kitchen to the only bathroom in the house.  This also needs lots of love like the kitchen does.  Lots of paint on cupboards and drawers and hopefully new hardware will make this space feel new and different.


Then on the first floor is the largest bedroom.

Then in the small hallway there is a stair case that leads upstairs to smaller bedrooms.  These both are slightly finished but atop the stairs is still raw cedar plank.  I'm hoping to pain this and brighten the upstairs.

If you look closely you can see the cutest gold
dust catchers in the corners of the stairs.
The raw cedar plank walls

The front small upstairs bedroom
The back small upstairs room
In the past week I have (along with help from my Dad) have painted the large bedroom and the living room.  I prepped the dining room so that my dad can tackle that while I'm at work tomorrow.  I'm hoping to also get the small bedroom upstairs painted before I make the big move in this weekend.  I want to be able to kind of set up my closet when I move in and painting that first will make it easier.  I haven't decided if I should do a color in the kitchen.  

Right now everything is being painted with Benjamin Moore's intense white.  It is covering wonderfully and giving it a nice cool white feeling.  At first it was a weird color next to the warm yellow beige white the walls were prior.  I had a small freak out moment thinking "AM I PAINTING MY HOUSE BLUE!?" Once the rooms were completed and the old color covered it feels white. So weird!

Can't wait to move my bed, couch, and other large items on Saturday.  It will be easier to work on the house once I'm in it instead of needing to prep to go work on it and just be there.


Wednesday, August 13, 2014

Upholstery Fabric Spray Paint

 I finally ordered another couple of bottles of upholstery fabric spray paint from Amazon so that I could finish my $20 craigslist chair.  I had done research previously and ended up purchasing Simply Spray in navy.  I had read that you had to buy a lot of this stuff to make it stick but I didn't think that I needed 6 BOTTLES for this one chair!


Mid Project when I ran out of paint... 

My new cozy reading corner!
The navy ended up covering really well after going through all 6 bottles.  The fabric is a little stiff but I think it is because I was painting a crushed velvet chair.  A different fabric might not stiffen the same.  If you look closely you can definitely tell it was a DIY but for a chair that is going to sit in a corner for reading it will be perfect.  I'm not sure if this is the route that I would take for another piece of furniture and will just invest in a chair I like from the beginning... someday...

Monday, June 30, 2014

DIY Compact Bar Cart

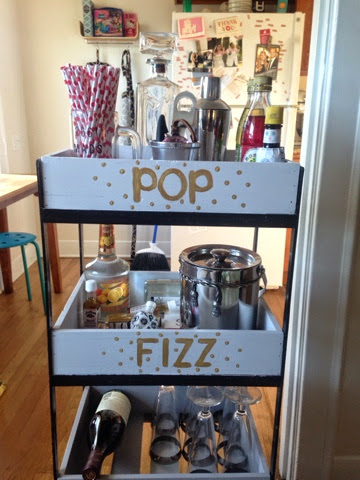
I love the idea of a drink cart however in a smaller apartment sometimes they can be challenging.  Back in January I picked up this little cart at Cost Plus Wold Market and thought it was perfect (I did wait patiently for a sale)! However the longer it sat in the corner all naked, the more I felt I needed to dress it up.  

My naked little bar cart

I stopped by Ace Hardware and purchased four paint samples that were next to each other on a gray swatch to achieve the ombre' look that I had in mind.


I have been seeing so many cute pop, fizz, clink party decorations that I couldn't help myself.

I had 4 shelves so I added a cheers to the end. 

Would I paint it with anything besides metalic gold for the letters?  I need to double over the letters to make sure everything looks well covered but I'm pretty pleased with my monday night craft project.  I can finally feel like my drink cart has a little more party to it.


Sunday, May 18, 2014

Turntable Love

I recently got a turntable from my dad and have started frequenting a couple record stores by my apartment. There is just something different about flipping through albums and they just seem to jump in my arms to be taken home. Unfortunately I did not have a good spot to put my new love and sitting on top of a speaker is just wrong.

Old Turntable Home
I salvaged a pice of wood from my parents house that would fit my turntable perfectly.  Then proceeded to stain it with a walnut finish so that it would look similar to my Better Home and Gardens TV stand.  I went to the local hardware store and picked up a couple white L brackets to attach it to the wall in a minimal way.

Ta-Da!! looking good turn table! 
I need to find a basket or bowl or something to put on top of the speaker so it doesn't look so naked.  I also had had my eye on a white ceramic ram head that I had seen at Retrofit Home.  I did not have a place in mind yet and I felt silly buying something that I didn't have a home for.  Once I put the shelf up I had a great vision for the ram head.
I finally found a home for my peacock painting from India as well
I used a clear acrylic frame for the my peacock silk painting but I'm not sure how I feel about it.  I might need a gold frame around it to make the print stand out a little more.
looking good!
Now if I could just make up my mind on what color I want my speaker covers to be I could get that done and my entertainment center will be looking great!

and a selfie for good measure because I got a new necklace


Sunday, April 20, 2014

DIY Terrariums

I've been trying to figure out a way to have plants in my house with The Mayor.   
So far the score is 
Mayor Buttons: 4 
House plants: 0

I picked up some globe terrariums (from Safeway of all places).  They caught my eye since they were hanging from the ceiling and my brain immediately went to "my cat can't reach that!"

I woke up Saturday and headed to a local nursery called City People's down in Madison Park. After walking around with different ferns and smaller plants in my hand I stumbled upon the air plant display.  They just seemed really easy, cool, and I decided that was the way I wanted to go. 

They even had instructions so I don't kill them.

I also picked up raindeer moss to add some brighter green to the mix

I picked them out in different sizes so everything didn't end up looking uniform.

I unhooked them all and did them one by one.

They turned out so so so so good!

Ha, he can't reach them!


M

Friday, April 18, 2014

My Bed is Here! My Bed is Here!

After only an hour of frustration my new bed is all put together! It looks better than I even imagined it!


Of course I had forgotten to pick up queen sized sheets which required a Target run at 9:00 at night. And my will power at that time of night is very very low. So my scouting of night stands turned into a purchase. 


This little yellow cutie came home with me! My vision on Polyvore is actually coming together and looking great.
 Next up is artwork... I need a new piece for above my bed. I'm in love with this Johnathan Adler print but since it is out of my price range a DIY version will be coming soon. 

I was also internet perusing and decided I had to have this ceramic retro phone holder for my night stand. Thanks to Instagram I recently stumbled on Hattan Home and have been discovering the most adorable apartment accessories.


I'll just live in this apartment forever please & thank you

M